

How To Copy Only Changed Files In Windows 10
Want to use XCopy to copy only new or modified files
Xcopy is a command line utility for copying multiple files or entire directory copse from ane directory to some other and for copying files beyond a network. As well, y'all are allowed to re-create only new or changed files with it. And information technology is used in Windows 7/8/10/11/XP/Vista and Windows Server 2003/2008/2012/2016/2019/2022.
Copying but inverse files with XCopy saves much fourth dimension and disk space, thus many users are willing to only copy updated files. Below is an example from it.
" I copy my files from Windows 7 to Server 2008 with the post-obit command, but information technology copies everything.
xcopy C:\source X:\destination /due south
I just desire to use XCopy command to re-create but newer files, because these files are very large. It's time-consuming.
Is in that location a way to specifically simply re-create new or updated files without specifying a appointment? Whatsoever suggestion will be appreciated."
How to copy only newer files in Windows 10 effectively
To copy simply newer files in Windows 10, XCopy or Robocopy is a good choice for loftier-level users to perform batch operations. And Information technology is able to backup only inverse files instead of all files, fifty-fifty without booting into Windows.
Simply the trouble is you need to execute this functioning manually every fourth dimension, which may make you feel tired and fourth dimension-consuming. And information technology's not user-friendly to nearly users for its high requirement. Thus, in this article, I'll introduce y'all to how to re-create only changed files automatically without XCopy or Robocopy.
You need an all-in-1 backup software - AOMEI Backupper Standard to help you out. All the operations are based on an intuitive interface, so y'all can easily understand and apply it like a professional person. It provides you with 2 helpful means to achieve this goal and you lot can choose to re-create files with its original structure or compress it to an image file.
Utilize XCopy to copy only newer files
Before using XCopy to copy only changed files, you demand to larn the syntax and some parameters you will use.
Syntax of XCopy command line:
Xcopy [source] [destination] [/w] [/p] [/c] [/v] [/q] [/f] [/l] [/k] [/d [:MM-DD-YYYY]] [/u] [/i] [/due south [/e]] [/t] [/k] [/r] [/h] [{/a | /grand}] [/north] [/o] [/x] [/exclude:FileName1[+[FileName2]][+[FileName3]] [{/y | /-y}] [/z] [/b] [/j]
Options:
- /S Copies directories and subdirectories, unless they are empty. If yous omit /s, xcopy works within a single directory.
- /Y Suppresses prompting to confirm that you want to overwrite an existing destination file.
- /I If in doubt always assume the destination is a folder. east.grand. when the destination does not exist.
- /E Copy folders and subfolders, including Empty folders.
- /D:mm-dd-yyyy Copies source files inverse on or after the specified date merely. If you do not include a MM-DD-YYYY value, xcopy copies all Source files that are newer than existing Destination files.
- For more options, you lot tin type xcopy /? for all the assistance or refer to xcopy control in Microsoft.
- ★Tips: To re-create but updated files with XCopy, you have 2 options, namely using /s /d, or /i /d /y. And there are something you need to exist enlightened:
- This first option will re-create files that does not exist in the destination folder if you lot use /d parameter without specifying a date. To avert it, you could add the /u switch.
- The second selection will ignore the new directories by default. To re-create everything, including new directories, you should add together the /e switch.
Now, see beneath and learn the detailed steps. Annotation that if there are spaces in your directory names, you lot need to employ quotes.
Step 1. Blazon cmd in the search box and select it.
Step two. Use XCopy to Copy only updated files with corresponding commands. Delight call up to hitting Enter after each one.
#one: Copy only updated files that are not in the destination folder, type the following commands.
set up SourceDir=D:\Source
set TargetDir=K:\Target
xcopy %SourceDir% %TargetDir% /s /d
#2: Re-create only changed files without new directories, type the following commands. Delight remember to supervene upon "D:\Source" and "F:\Target" with the path of your files.
prepare SourceDir=D:\Source
set up TargetDir=Grand:\Target
xcopy %SourceDir% %TargetDir% /i /d /y

#iii:Copy changed files already exists in the destination path, type the following commands:
set up SourceDir=D:\Source
set TargetDir=M:\Target
xcopy %SourceDir% %TargetDir% /s /d /u
#4: Copy everything including the new directory, type the post-obit commands. Please remember to replace the following path "D\My Source\stuff" and "F:\My Backup\stuff".
Fix SourceDir="D:\Source\copy files"
Set TargetDir="Thou:\Target\files copied"
xcopy %SourceDir% %TargetDir% /i /d /y /east

Footstep 3. Blazon exit and hit Enter to leave this window.
Utilize Robocopy to re-create merely new files
Robocopy tin also help you copy just new files, but it has more options than Xcopy and is considered every bit a skilful alternative. Before you use it, delight learn the syntax and options you may use.
Syntax of Robocopy command line:
robocopy [source] [destination] [[file][ ...]] [options]
Options:
- /XO: is used to exclude older files, and ordinarily washed with the parameter"/maxage: n".
- /maxage: due north: indicates that the uttermost modification time or the specific date, the file whose modification time or appointment is older than this will non be copied.
- /XC: Exlude changed files.
- /XN: Exlude newer files.
- /XD dirs [dirs]: Exlude directories mathcing given names and paths.
- /S: Copy subdirectories, excluding empty ones
- /Z: Restartable fashion
- /fft: Make the modify fourth dimension comparison more than tolerant(2 seconds granularity)
- /Mir: Mirror a directory tree
- For more options, you can type robocopy /? for all the assistance or refers to Robocopy control in Microsoft.
- ★Tips:
- To copy only changed files with Robocopy, yous take two options, namely using maxage: n or /XO /maxage: n.
- Some users say that they don't want to create all the subfolders on the target disk if there is no new files in them. In this case, yous need to add extra switch /S to exclude the empty folder.
And then, let'south go through the following steps to copy only new files:
Step 1. Open the command prompt with administrator priority.
Step two. Apply Robocop to re-create merely newer or added files with respective commands. Delight remember to hit Enter in club.
#1: Copy only newer or added files, type the post-obit commands:
robocopy D:\folder1 E:\folder2 / maxage:7or robocopy D:\folder1 Due east:\folder2 /XO /maxage:7

#2: Copy new files while excluding an empty binder, blazon the following commands.
robocopy D:\folder1 Due east:\folder2 /s /maxage:vii orrobocopy D:\folder1 Due east:\folder2 /XO /s /maxage:7
Copy only newer files easily without XCopy or Robocopy
Here you will use professional file sync or backup software - AOMEI Backupper Server to re-create only newer files automatically and hands. And y'all can It provides you lot 2 easier means to complete this task in Windows seven/8/eight.i/ten/11/XP/Vista, namely using Sync or File Backup features.
- File Sync: It allows you to keeps files just as in the original binder, and you can easily access or use them after syncing. By default, the Bones Sync does not sync deleted files from source folder to destination binder automatically. And you can choose to sync files in real-fourth dimension, or utilise mirror sync or 2-fashion sync style.
- File Backup: It will compress all the files into an epitome file and you need to restore files from fill-in earlier using it. This greatly reduce information loss due to any unwanted access and the chance of files beingness corrupted or modified.
Then, which one should you use?
>> If you are more concerned nigh the file availability, yous could use File Sync.
>> If you feel that file security is of paramount importance, you could use File Fill-in.
Afterward, copy files and its new changed files with Sync or Backup feature.
Sync only new or modified files but every bit it was
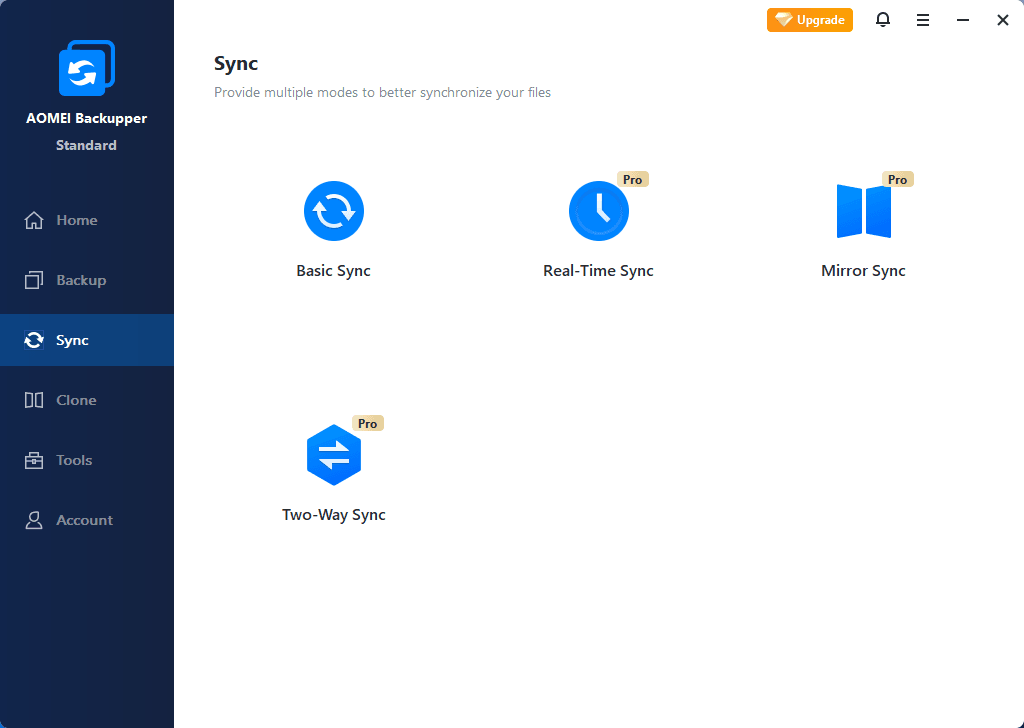
Here you lot volition utilise the Sync feature to sync only changed files. It has 4 sync options and comes along with helpful features, such as, daily, weekly, month schedule sync. And all of them has their own features, you tin bank check details in the post-obit box.
| Basic Sync | Real-Time Sync | Mirror Sync | Two-Way Sync | |
| Sync newly added or changed files. | Aye | Yep | Yep | Aye |
| Sync deleted files from source folder to destination binder automatically. | No | Yes | Yep | Yes |
| Sync changed files in real time. | No | Yes | No | No |
| Deleted newly added files or undo changes made in the destination folder. | No | No | Yep | No |
| Sync changes from source folder to destination folder, and vice versa. | No | No | No | Yes |
| Support schedule sync: daily, weekly, monthly, event triggers, USB plug in. | Yes | No | Yes | Yeah |
Then, get to the Sync tab and copy only newer files with ane of them. Here Take Basic Sync equally an instance.
Step 1.Download AOMEI Backupper Professional, install and launch it. And then, prepare an external hard drive or other storage as sync destination and connect it to your computer.
(PS: The free trial version can only be used within xxx days, to continuously protect data, please upgrade server trial now! 100$ off per one server computer.)
Step 2. Go to the Sync tab and select Basic Sync.

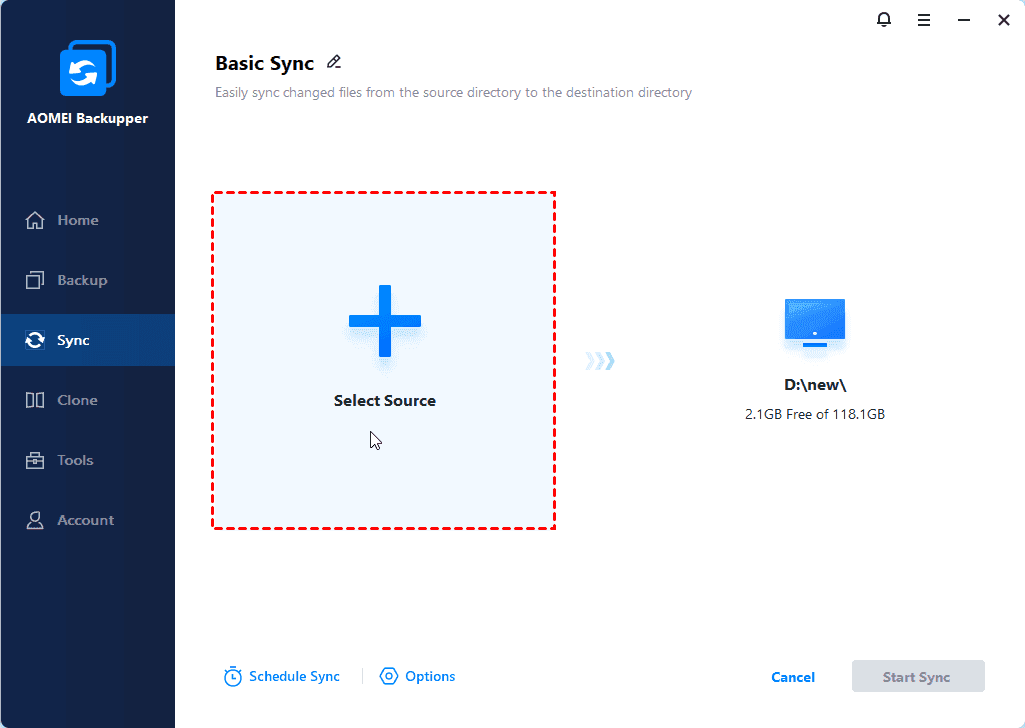
Stride iii. Click Add Folder to select folders containing all the files yous want to sync. Then, select the sync destination by clicking the folder-shaped push below.
Step 4. Click Schedule and Enable Schedule Sync, then select Daily, Weekly, or Monthly. To set the sync job more precisely, y'all can specify the backup time or intervals in the following.
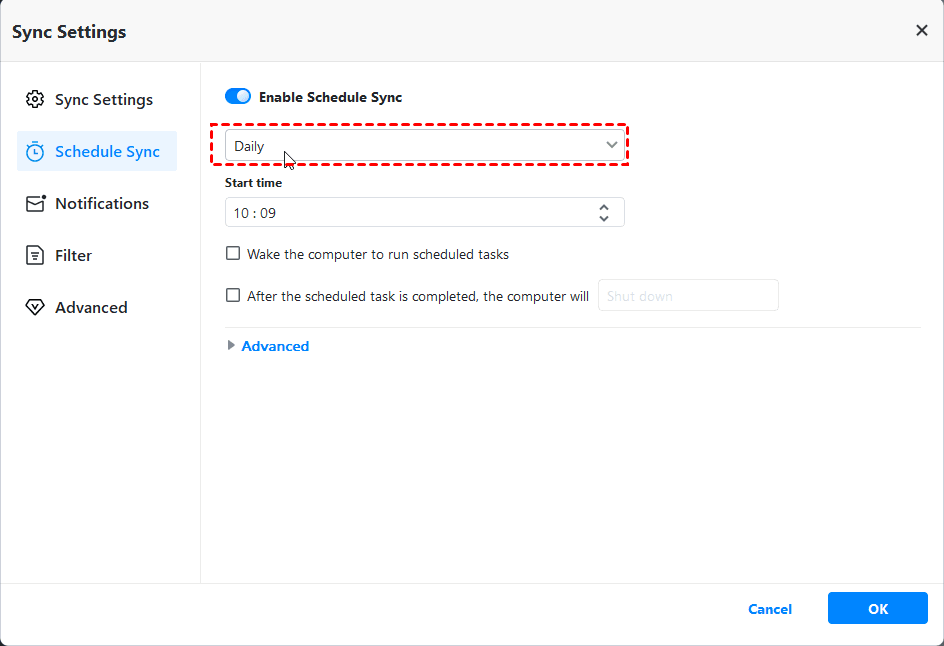
In addition, you tin can still enjoy other helpful features:
- Result triggers: It helps when you want to sync files at system shutdown, system startup, user logon or user logoff.
- USB plug in: It makes syncing files betwixt calculator and flash drive flexibly, you lot just need to connect the USB bulldoze when you want to sync changed files.
- Wake the computer to run scheduled tasks: It allows you to wake up reckoner 2 minutes earlier the scheduled task start, without human intervention required.
- Reconfigure the operation subsequently the scheduled tasks: You can shut down restart your computer later on syncing, or simply put it into slumber or hibernate mode.
- Sync the deletions in source directory to destination: By checking it in the Options, you can sync the deleted files besides.
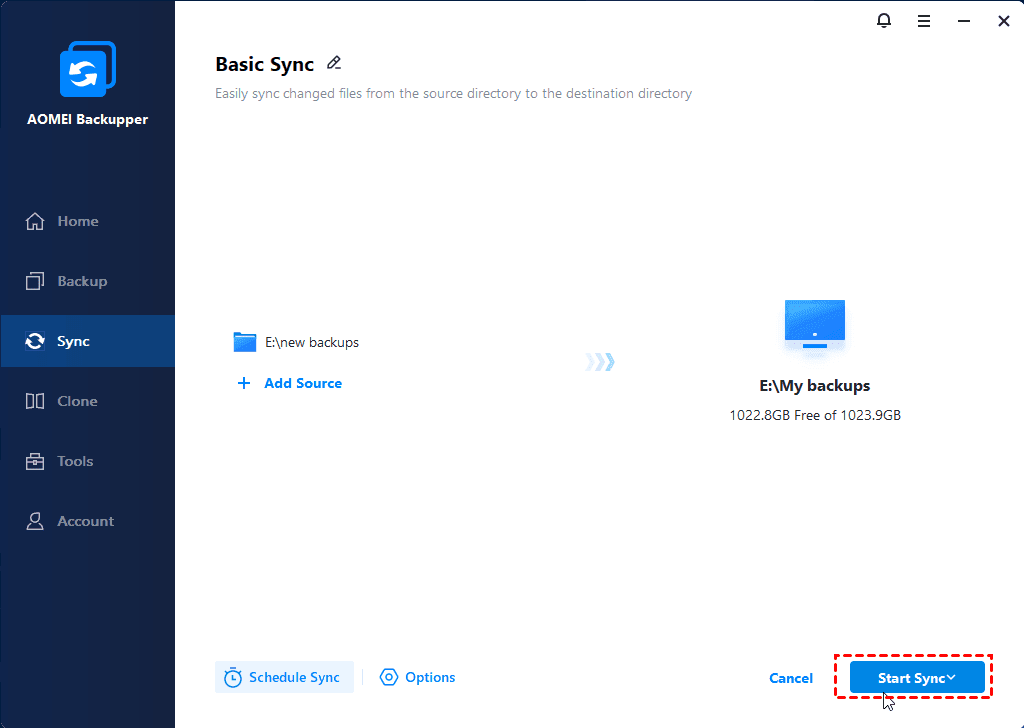
Stride 5. Confirm the operation and click First Sync to sync all the files to the destination binder. Then, it will sync changed files at the next time.
Safer way to copy only new or modified files
Except for Sync characteristic, you still can complete this job with the aid of File Backup. It comes along with daily/weekly/monthly schedule backup also as incremental or differential fill-in. By using it, yous tin can yet set precise fill-in fourth dimension and intervals.
They are based on full fill-in, merely non exactly the same. For differences, you tin run into from the comparison chart below.
| Full Backup | Differential Backup | Incremental Fill-in | |
| Backup Speed | Slowest | Moderate | Fastest |
| Storage Infinite | Most | Moderate | Least |
| Restoration Speed | Fastest | Moderate | Slowest |
Also, if yous want to fill-in files during off-peak hours, you can wake computer from sleep or hide mode before the scheduled tasks offset. And you tin can Reconfigure the functioning after scheduled tasks, to shut down or restart your computer or put it into sleep or hibernate mode.
In the long run, you may worry about the fill-in deejay total oneday. Fortunately, you tin can avoid this upshot by deleting former backup epitome regularly with its Backup Scheme feature. Normal or High compression level, Intelligent sector backups also help with this. Then, run across below and larn the specific steps.
Stride 1. Go to the Backup tab and selectFile Fill-in.

Pace 2. ClickAdd File orAdd together Folder to select the files or folders yous want to backup and then click OK. Then, select the prepared storage device to store your image.

Step three(Required). ClickSchedule andselect Daily, Weekly, Monthly. Then, click Backup Scheme and select Incremental Fill-in or Differential Fill-in under the backup method pick.

In add-on, yous tin manage the backup task with more helpful features.
- USB plug in: To backup your files flexibly and take them everywhere, you can create a schedule backup with "USB plug in" feature. It does not require any homo interference.
- Normal or Loftier compression level: It is able to compress image file with a smaller one, thereby saving deejay space. Note the high pinch level requires more backup time.
- Intelligent sector backup: It only backs up the used sectors of the file organisation,
- Backup Scheme: It offers y'all 3 options to delete backup files, including By quantity, By fourth dimension and By daily/weekly/monthly.
Step 4. After that, confirm all the selected settings and clickGet-go Backup. It volition backup your files immediately and then backup but changed files at the next time.
Bonus tip
You can copy only newer files with XCopy or Robocopy, merely it is actually more than suitable for technical people. For others, it's suggested to use professional file sync or fill-in software - AOMEI Backupper Standard. With information technology, you just demand to click a few times with its prompted screen.
Information technology allows you to brand this task automatically with its daily, weekly, monthly event trigger or USB plug in schedule settings. And you lot can choose to keep its original structure or shrink them to an paradigm file to avoid any unwanted access and maliciou file corruption.
Believe me, it's one of the most powerful software to protect your data with its consummate solution. To copy files from server to server within one visitor, you lot could utilise AOMEI Backupper TechPlus. Please download it to have a try correct now!

How To Copy Only Changed Files In Windows 10,
Source: https://www.ubackup.com/windows-server/xcopy-copy-only-newer-files.html
Posted by: kellywalway.blogspot.com
0 Response to "How To Copy Only Changed Files In Windows 10"
Post a Comment