

How To Clean Up A Scanned Photo In Photoshop
You know what one of my biggest pattern pet peeves is? When I'm designing something, but in that location's an unwanted background on the image I'one thousand editing. In this article, you lot'll learn how to remove a photo background altogether, or brand it transparent so the image assumes the look of any other background you put behind it. Consider the above feature image. The image to the left would be so much more than useful to my call-to-action, SlideShare presentation, web log mail, or ebook if I could just remove that pesky background so it looked similar the image on the right. Or peradventure yous've downloaded some other one of our collections of free stock photos that could as well use a transparent background. Luckily, there is something you can do about it. Using either Photoshop or PowerPoint, you can easily remove the background of your photo or image in no time. And I'1000 going to testify you lot exactly how to do it. First, grab an paradigm to exercise with. You can download ane from our latest collection of royalty-free stock photo hither ... Got an prototype whose background you want to remove? Cracking -- permit's go started. Considering some of you may not accept Photoshop at your disposal, permit'south start with instructions for PowerPoint. You tin as well jump down to the instructions for Photoshop hither. Keep in mind that you'll need to be using Function 2022 or later, and because PowerPoint isn't as sophisticated as Photoshop, it may not piece of work for some of the more difficult images. But if you don't have access to Photoshop, this could be just what you need. Images with white/solid backgrounds or those that have high contrast with the foreground are the easiest to manipulate in PowerPoint. See how it's cutting off part of the girl's body and cape above? First, drag the box around the prototype so information technology includes the unabridged area of the image you desire to keep. Keep in mind that the areas highlighted in purple volition ultimately be removed. Using your cursor, however, y'all can be even more than precise near what you want eliminated. Hover over both the purple groundwork and the subject in your picture -- you'll run across your cursor produce either a plus sign or a minus sign. The minus sign, when hovering over your subject, allows yous to mark areas to remove -- simply click on any additional areas yous would like to remove. If there are majestic areas you really desire to keep, hover over any purple spot and click to marking areas to keep -- they volition characteristic a plus sign. To get a closer look at the areas you want to select, zoom in on your epitome. Below, you'll run across small minus signs surrounding areas of the girl'south hair -- I clicked on these spots where I thought PowerPoint might get confused as to which parts of the background between strands of hair should go or stay. PowerPoint could run across these strands of hair every bit the border of the girl, and not remove the background between this hair and the rest of her caput. In this blazon of case, these minus signs tin help you. If y'all happen to mistakenly include or exclude something, just click on the plus or minus sign that covers the expanse, and it will disappear. Final merely non to the lowest degree, salve the image as a PNG file to preserve its transparent background. Because Photoshop is much more sophisticated than PowerPoint, in that location are a few different methods you can use to make a background transparent. Each is skillful for a different kind of image. Click the links below to spring to the tutorial for each method: Let's say I want to remove the blue groundwork (too as the pole) from this "stop spam" prototype. Because this image is made upward entirely of straight edges, this method of background removal is perfect. Here's how to brand that blueish background (and the silver pole) transparent. The beginning affair you'll desire to do after yous drag and drop your prototype into Photoshop is convert it into a "Smart Object," and then rasterize it. Here'due south how: Next, click on the Layer dropdown again, but this time, highlight Rasterize , and then click Smart Object . Now you're ready to convert that pesky groundwork into a transparent one. You lot tin can zoom in and out by clicking the View dropdown and choosing Zoom In or Zoom Out, or using the keyboard shortcuts as indicated. The Polygonal Lasso Tool looks similar this: Once selected, click on a starting indicate, and trace the office of the image you want to keep using a series of clicks from point to point. I prefer to get rid of the black edge on the stop sign, so I'm tracing the sign just within the outer edge of the white border. Once yous've made it all the style effectually your epitome, connect your line to the first signal you started with. Yous'll know it's connected when your cursor includes a picayune circle, as shown below. Once you connect your line to your first point, a flashing dashed line will form effectually your paradigm, similar so ... Do this by clicking the Select dropdown in the elevation carte du jour, and clicking Inverse. This will highlight the entire background you want to brand transparent. Hit Delete on your keyboard, and the background volition turn into a checkered grid like you see below. This is how yous'll know your groundwork is now transparent. This volition ensure your background transparency stays in tact. Okay, now let's say your image isn't as direct-edged as the image in the example above, and it's got some curve to it, like the prototype below. Here, you lot'll want to use the Quick Choice Tool. But like we did with the Polygonal Lasso method, the kickoff thing you'll want to practise after yous drag and drop your image into Photoshop is convert it into a "Smart Object," and then rasterize it: The Quick Selection Tool is right beneath the Polygonal Lasso Tool, and information technology looks similar this: This tool takes some getting used to, but once you lot go the hang of it, information technology's ane of the fastest and easiest ways to remove the groundwork from a photo. Start clicking around on the background to highlight the parts y'all desire to remove. Arrange the size of the pick tool accordingly. I recommend starting with a larger size, since that volition permit y'all to select larger sections of your background at a time, speeding upwards the procedure. Repeat this process until the entire background of the epitome is selected: Oops! Permit'south say yous notice role of the epitome you desire to go along is getting highlighted forth with the groundwork, similar you lot see in the screenshot below. Have no fright -- y'all can decrease parts of the image that accidentally get highlighted: First, click on the Subtract From Pick button in the toolbar at the height. (Alternatively, you can agree down alt while you click on a PC, or option while yous click on a Mac.) This is also something that may take some getting used to, but the trick is to position your cursor right along the inner edges of the role of the image you want to keep. You may want to accommodate the size of your Quick Selection tool for some of the finer details. Then click so the incorrectly highlighted section gets detracted. Finally, click Delete on your keyboard to brand the background transparent. This will preserve the transparency of your background. Pro Tip: Sometimes using the Quick Selection Tool results in jagged edges, peculiarly on parts of the prototype where the edge should be a straight line. This tends to happen most on depression-resolution images. If information technology happens to you, try smoothing out the jagged edges using the Polygonal Lasso method later first removing the groundwork with the Quick Choice Tool. At that place's a third method you tin fall back on if the beginning ii methods merely aren't cutting it. This is groovy for images that demand a little chip more precision, although to be honest, the first two methods usually do the trick for me. The i time this method comes in handy for me is when I need to make clean up some of the edges of images whose backgrounds were removed via the first 2 methods. For example, I used the Polygonal Lasso Tool in Photoshop to remove the background of the shark boy image at the very superlative of this article, only I cleaned up the spaces in between his fingers (which needed a piddling chip more precision) using the Brush Method. Just like the starting time ii methods, the outset thing yous need to do later on you drag and drop your image into Photoshop is convert it into a "Smart Object," then rasterize it: The Brush Tool is right below the Cherry Center Tool, and it looks like this: Correct below the top menu, change the Mode to Clear. Then click the drop-down arrow adjacent to the brush size box, and change the Hardness to 100%. This will essentially transform your Brush Tool into an eraser. Erase your background by clicking and dragging. Adjust the size of your Brush Tool and zoom in on your image for more fine-tuned precision. Once you accept your prototype the way you want it, save it every bit a PNG. This volition preserve the transparency of your groundwork. That's information technology! Hopefully image background removal is at present much easier for you using at least one of these methods. 
How to Make a Picture Background Transparent in PowerPoint
How to Remove a Photo Background in PowerPoint
1. Insert the epitome into PowerPoint.

2. First, click on your image. Then, under 'Picture Format' on a Mac (or 'File' on a PC) in your toolbar, choose 'Remove Background.'
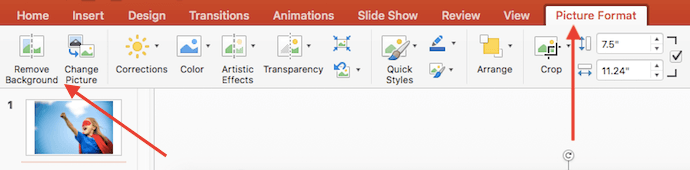
three. PowerPoint will automatically try to remove the background, only it might not become it just right.
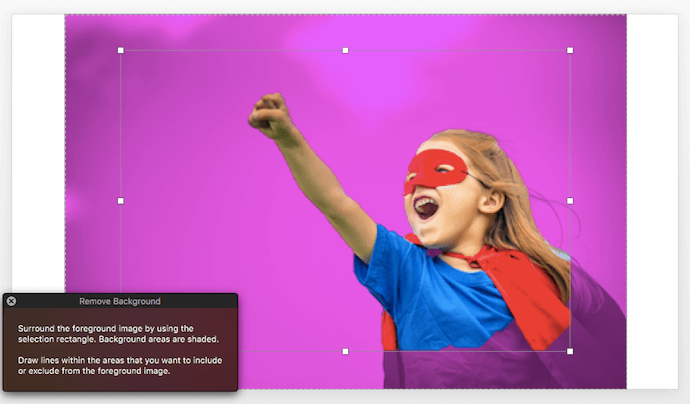
4. Using the options in the toolbar, click to mark areas you want to keep or remove from the terminal cropped image.

v. Click somewhere outside of the image when you're finished.

How to Make a Background Transparent in Photoshop
The Polygonal Lasso Method: For Images With Directly Edges

ane. Get your image ready in Photoshop.


2. Zoom in on your paradigm so yous can be more precise with your background removal.
3. Select the Polygonal Lasso Tool from the toolbar on the left.
![]()

iv. Connect the line with your starting betoken.


5. Select the background you want to delete.

6. Delete the background.

seven. Relieve your image every bit a PNG file.
The Quick Selection Method: For Images With Round or Wavy Edges

1. Get your epitome ready in Photoshop.
ii. Choose the Quick Selection Tool from the toolbar on the left.
![]()
3. Click the groundwork to highlight the role you want to brand transparent.


4. Subtract selections as needed.


five. Delete the background.

half-dozen. Save your image as a PNG file.
The Brush Method: For Trickier Images
1. Get your prototype ready in Photoshop.
ii. Select the Brush Tool from the toolbar on the left.
![]()
3. Change the "Manner" and "Hardness" of the Castor Tool.

iv. Brush abroad the background.

5. Save your epitome as a PNG file.


Originally published Jun xiv, 2022 10:26:00 PM, updated June xv 2022

Source: https://blog.hubspot.com/marketing/how-to-remove-background-image-in-powerpoint-design-ht
Posted by: kellywalway.blogspot.com
0 Response to "How To Clean Up A Scanned Photo In Photoshop"
Post a Comment